Pages

Friday, December 22, 2023

Single Sign On using SAML2 for SAP Netweaver Java

Problem:

Single Sign-On Configuration for SAP Netweaver based on Java

Solution:

1. Open the Authentication & Signle Sign-On Screen on your java system by using url http(s)://hostname.domain:<Port>/nwa/auth or nagivate to the Configuration --> Security --> Authentication and Single Sign-On --> SAML 2.0


2.  Now Click on Enable SAML 2.0 Support , to create the Local Provider Configuration.


3. Now provide the provider name in specified format https://<Name> e.g https://hostname.domain or https://<SID> and Click on Next.


4. Now you need to create a Signing Key Pair / Encryption Keypair, by clicking on browse button.


5. Now Click on Create on open pop-up screen.


6.  Provide the relevant information on all the mandatory field.


7. Now Provide the suitable CN name and Country Name for the properties and Click Next to move forward.


8.  Review all the shown information under subject properties and Click on Finish.


9. After clicking on Finish, below entry will be created and now click on OK.


10.  Now you can see the signing and encryption key pair has been created. Click on Next to Move forward on next configuration step.


11. Now on the very next screen, Select Automatic under Selction Mode and Click on Finish to completed the intital configuration for Local Provider.


12.   Now Select the Metadata Tab for the created Local provider setting and updated the Digest Algorithm to SHA-256 and save the setting.


13. Now you can download the Metadata of Netweaver Java system by clicking on Download Metadata. Share the Metadata to ADFS Team / Cloud Team / Cloud Identity  for the relying trust party and get their Federation XML and its certificate .


14.  Now Click on Trust provider, then Add button and then Select the option Uploading Metadata File.


15.  Upload the Federation XML file which you have received in step 14.


16.  Now upload Federation signing certification. If your Team has provided the federation signing certificate in step 14, then you can manually extract the same from federation certificate content from under section <X.509 Certification> tag.Click on next till step 10.


17.  Choose the Comparison Method and Click on finish to complete the trust configuration.


18. Now  Click on Identity Federation, Then on Add Button and then select the format Name through which you want to have authenticate the user. In my case I am using EMAIL.


19.  Now select the Signature and Encryption tab and check the Digest Algorithm.


20.  Now Click on Enable to activate the configuration.


21. Now Select the tab Authentication and select ticket to add the SAML2 login module in it.


22.  Click on Add to Add the SAML2LoginModule with Flag SUFFICIENT.


23. Now Move the SAML2LoginModule to the top position by clicking on Move Up button and then Click on Save.


24. SSO configuration has been completed now. Make sure all the user should have email id assigned to their user in identity management.


Note:

To configure the SAML based authentication for abap system Please refer Link

Friday, November 24, 2023

Schedule Technical Repository Job in S/4 Hana

Details:

How to schedule SAP Technical Repository Job in S/4 Hana

Solution:

In the S/4 Hana system, SAP has introduced the Technical Repository Job, formerly known as the Standard Housekeeping Job. Within the Technical Repository, SAP has included pre-defined jobs that will be executed based on the system's scope.

As a first step, we have to defined the assign the step user for release lower than 7.51 SP3 it can be done through report R_JR_UTIL_1 and for release higher than 7.51 SP3 it can done through transaction SJOBREPO_STEPUSER.


After the technical jobs, can be generated through Program - R_JR_BTCJOBS_GENERATOR which will automatically scheduled the jobs.


Then you review the the scope Job status through tcode SJOBREPO, all the scope relevant job status will become green once the job will run successfully at its default defined time.


If you want to deactivate the job locally, then you can select the Job and F7 (Locally Deavtivate the Job) and for the reactivation of the same deactivated job it can de bone through SHIFT+F4.


In transaction SJOBREPO shows the message "Automatic Job Scheduling is switched off".


Then Automatically Job Scheduling can be activated through report R_JR_UTIL_1 by choosing option Change Job Repositiory state.


Friday, July 21, 2023

Configure the JavaMail Client in SAP

 Details:

Configuring the JavaMail Client in SAP

Solution:

The JavaMail Client in sap is used to send and receive email messages in Java applications. To configure the behavior of the JavaMail client service, you can make use of a set of properties. These properties are typically stored in following system properties of "Java Mail client" service.

Navigate to SAP NetWeaver Administrator Configuration -> Infrastructure -> Java System Properties -> Services -> "Java Mail client".


To set the properties for SMTPS:

mail.smtps.auth = true

mail.smtps.user = <smtps user >

mail.smtps.password = <smtps password>

mail.smtps.host = <smtps host> 

mail.smtps.port = <smtps port>

mail.smtp.starttls.enable = true

mail.transport.protocol = smtps


To set the properties for SMTP:

mail.smtp.auth= true

mail.smtp.host= <smtp host>

mail.smtp.password= <smtp password>

mail.smtp.port= <smtp port>

mail.smtp.starttls.enable= true

mail.smtp.user= <smtp user>

mail.transport.protocol= smtp

Navigate to SAP NetWeaver Administrator -> Operations -> Systems -> Start & Stop -> Java Services -> Select Java Mail client -> Restart.


Details description of some JavaMail Client Property

a. mail.smtp.host: The hostname of the SMTP server used for sending emails.

b. mail.smtp.port: The port number of the SMTP server (usually 25 for unencrypted connections or 587 for TLS/SSL connections).

c. mail.smtp.auth: Set this to "true" if the SMTP server requires authentication before sending emails.

d. mail.smtp.user: The username for authenticating with the SMTP server (if required).

e. mail.smtp.password: The password for authenticating with the SMTP server (if required).

g. mail.smtp.starttls.enable: Set this to "true" if you want to use the STARTTLS protocol for secure communication with the SMTP server.

h. mail.smtps.host: Similar to mail.smtp.host, but used for SSL/TLS connections.

i. mail.smtps.port: Similar to mail.smtp.port, but used for SSL/TLS connections.


Tuesday, May 30, 2023

SAP OS/DB Migration - II

Details:

SAP OS/DB Migration - II

Solution:

Different System Copy Methods


SAP System Copy or Migration Tools for ABAP

SAPINST:

SAP system installer controlling the system copy process.

R3LDCTL:

Create database independent table and index structure files (*.STR).

Create view structure file (SAPVIEW.STR).

Create database specific DDL command tempelate (DDL<DBS>.TPL or DDL<DBS>_LRG.TPL).

R3SZCHK:

Computes the size of ABAP tables/indexes and stores them in extent file (*.EXT).

Limit Calulation of object extent size to 1700 MB.

Create target database size file (DBSIZE.XML)

R3LOAD:

Unloads or loads ABAP table data from or into the DB.

Write platform independent data dump format.

Supports table splitting.

Character set conversion to unicode are implemented in R3LOAD.

Control the restart of object if R3load fails by using task file (*.TSK).

SMIGR_CREATE_DDL (ABAP Report):

Generates DB-specific DDL statements for nonstandard DB objects of the ABAP Dictionary, mainly SAP Business Warehouse (BW) objects.

Generate <TABART>.SQL files

RS_BW_POST_MIGRATION (ABAP Report):

Posts system copy activities for nonstandard DB objects in the ABAP Dictionary.

Mandatory for all SAP BW and SAP SCM systems.

MIGMON: 

Migration Monitor is a tool provided by SAP for managing and monitoring the migration process during an SAP system migration. It is designed to assist in executing, controlling, and tracking the various steps involved in a system migration.

Monday, May 29, 2023

SAP OS/DB Migration - I

Details:

SAP OS/DB Migration - I

Solutions:

SAP OS-DB migration is a conventional technique used to migrate the operating system or database of an SAP system to a newer version, implement system architecture changes, or transition to a different operating system or database supported by SAP. This migration process can be classified into two types: homogenous and heterogeneous system copies.

Homogenous System Copy :

A homogeneous system copy refers to a migration process where the source and target systems have the same operating system and database platform. In other words, the underlying technology stack remains consistent throughout the migration.

Hetrogenous System Copy :

A heterogeneous system copy involves migrating from one operating system or database platform to a different one. This means that the source and target systems have different operating systems or database platforms. In this scenario, additional steps and considerations are necessary to ensure a successful migration and compatibility between the systems.


After reading the above information , there is a question which will usually arise in mind that, "What is the difference between Migration and System Copy ? ".

Migration and system copy are related concepts in the context of SAP systems, but they have distinct meanings and implications.

Migration generally refers to the process of moving an existing SAP system from one environment to another. This could involve transferring the entire system, including the operating system, database, and application components, to a new server or infrastructure. The goal of migration is to ensure a smooth transition of the entire system while minimizing downtime and preserving data integrity.

On the other hand, a system copy specifically refers to duplicating an existing SAP system, either in the same environment or in a different one. System copies are often performed for various purposes, such as creating development or testing environments, system upgrades, or system refreshes. The focus is on replicating the system configuration, data, and settings rather than transferring the entire system infrastructure.


In the context of SAP OS/DB migration, the import/export method and the backup/restore method are two distinct approaches used for different purposes. Here are the differences between the two methods:


Import/Export Method in SAP OS/DB Migration:

Scope: The import/export method focuses on transferring specific data objects or subsets of data from the source system to the target system.

Data Granularity: It allows selective extraction and migration of specific data sets, such as tables, records, or schema.

Format: Data is typically exported in a structured format, in data dump file.

Transformation: The exported data may require transformation or manipulation before it can be imported into the target system. This could involve data mapping, conversion, or cleansing.

Flexibility: The import/export method provides flexibility in terms of migrating specific data components or subsets, allowing customization of the migration process.


Backup/Restore Method in SAP OS/DB Migration:

Scope: The backup/restore method focuses on capturing and restoring the entire SAP system, including the operating system, database, application components, and configurations.

Completeness: It provides a comprehensive snapshot of the entire system at a specific point in time, ensuring the recovery of all system components.

Format: Backups are typically created in proprietary formats specific to the SAP system, optimized for efficient storage and restoration.

Point-in-time Recovery: The backup/restore method enables the restoration of the system to a specific point in time, facilitating recovery from system failures, data corruption, or other issues.

System-level Restore: It involves restoring the complete SAP system infrastructure, including the operating system, database, application files, and associated configurations.

In summary, the import/export method in SAP OS/DB migration is focused on selective data transfer, while the backup/restore method is concerned with system-level recovery and restoration of the entire SAP system.

Wednesday, May 10, 2023

SAML2 Configuration for SAP ABAP Platform

Details:

Step-by-step configuration instructions for Single Sign-On (SSO) access to SAP ABAP using IDP (ADFS). We have two scenario, for the configuration of SAML2

Scenario 1:

We have a SAP Web-dispatcher infront of SAP Application Server to access the url.

Scenario 2 :

We are directly accessing the service of SAP Application Server (Without Wed-dispatcher)

Pre-requisite:

SSL need to be configured first before configuring for SAML2 authentication.

Steps:

Activating the Services

1. Goto Transaction SICF, enable below services 

    /sap/bc/webdynpro/sap/saml2

    /sap/public/bc/sec/saml2

   /sap/public/bc/sec/cdc_ext_service

   /sap/bc/webdynpro/sap/saml2

   /sap/public/bc/icf/logoff

   /sap/public/bc/sec/saml2

   /sap/public/myssocntl

   /sap/bc/saml2/idp/sso

   /sap/bc/webdynpro/sap/SAML2_IDP

2. On the Maintain Services page, enter one of the service name from the list.

3. Right-click the service in the tree menu view, select Activate Service.

4. Prompt to activate the service, click Yes with tree option.

Enable SAML2 Local Provider Setting

1. Run the transaction SAML2 or open the URL 

https://<FQDN>:<ICM_HTTPS_PORT>/sap/bc/webdynpro/sap/saml2?sap-client=100&sap-language=EN

Note : If you want to use webdispatcher then open the SAML2 URL through webdispatcher Url 

https://<WEBDISPATCHER_FQDN>:<WEBDISPATCHER_ICM_HTTPS_PORT>/sap/bc/webdynpro/sap/saml2?sap-client=100&sap-language=EN


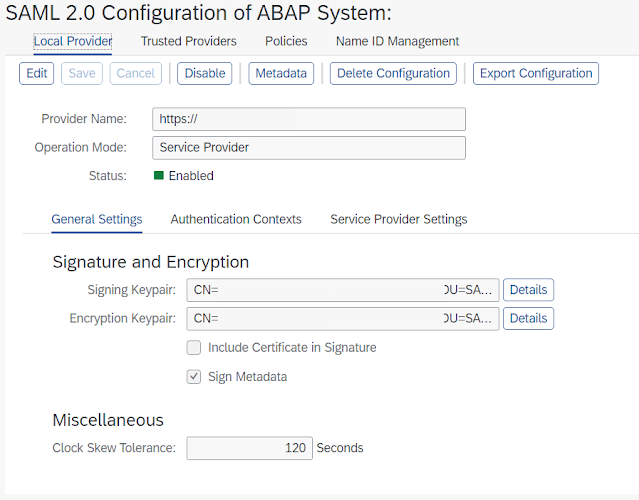
2.  Click on Enable SAML2.0 Support and Select "Create SAML 2.0 Local provider".


3. Enter the Provider Name https://<SID>CLNT<CLINET_NO> on Intital setting screen. Click Next.


4. Choose Automatic in Selection Mode on Service Provider Settings and Select Finish.


5. After Click on Finish, it will be redirect you to Configuration Page.


6.  Click on Metadata button to get pop-up for the metadata download, then select Download Metadata.Make sure browser pop-up is allowed.


7. Share the Metadata.xml file with the ADFS team, for Relying Party Trust (RPT) in ADFS for the SAP system.

8. Once RPT is done, ADFS will share the federation XML file and certificate which has been used to sign your metadata xml. If in case they do not share the certificate then you can extract the certificate from federation xml.

9. As a next step, open the SAML2 and click on Trusted Providers tab.


10. Select the the Upload Metadata File


11. Upload the federation xml in Metadata file.


12.  In the Next Step Metadata Verification, Upload the federation certificate and Click Next


13. In Signature and Encryption Step Choose the Digest Algorithm


14. In Authentication Requirements, Choose the shown and Click Finish.


15. First Click on Edit and then Add then select the Unspecified and then Save the setting.


16. Then Click on Enable to activate the configuration.


17. Goto Transaction SICF , enter the service name or external alias example /sap/bc/ui2/flp and open the service


18.  Select Logon Data Tab. Choose the Alternative Logon Procedure and set SAML Logon at 1 and Save.


19 . Test the Service by directly copying the require in browser. In case of any RPT error . Please reach out to ADFS Team.

20. For any other issue access the Security Diagnostic tool using the URL: https://<host>:<port>/sap/bc/webdynpro/sap/sec_diag_tool?sap-client=<sap_client>

21. Log on with a user that has the role SEC_DIAG_TOOL_VIEWER or full administrative rights in the specified ABAP system.

22. In the Name field, enter a description trace file name.

23. Choose the severity of the trace which you needed  (ex :  Debug, Info, or Error).

24. Click on Start to activate the trace.

25. Reproduce the SAML2 error.

27. Stop the Activated trace, download the generated file. If you need help from SAP then Incident can be raised on component BC-SEC-LGN-SML.

Note :

- Till now due to SAML2/ADFS limitation it is not possible to configure the SAML2 SSO for two different client of the same system.

- If you want to configure the SAML2 SSO for both Webdispatcher and Backend URL then additional share the below URL to ADFS team during RPT.

Example :

https://<Webdispatcher_ALIAS_FQDN>:<WEDB_ICM_PORT>/sap/saml2/sp/acs/<CLINET_NO>

https://<Webdispatcher_Physical_FQDN>:<WEDB_ICM_PORT>/sap/saml2/sp/acs/<CLIENT_NO>

https://<BACKEND_FQDN>:<BACKEND_ICM_PORT>/sap/saml2/sp/acs/<CLIENT_NO>

https://<Webdispatcher_ALIAS_FQDN>:<WEDB_ICM_PORT>/sap/bc/ui2/flp?sap-client=<CLIENT_NO>&sap-language=EN#

https://<Webdispatcher_Physical_FQDN>:<WEDB_ICM_PORT>/sap/bc/ui2/flp?sap-client=<CLIENT_NO>&sap-language=EN#

https://<BACKEND_FQDN>:<BACKEND_ICM_PORT>/sap/bc/ui2/flp?sap-client=<CLIENT_NO>&sap-language=EN#

Tuesday, May 9, 2023

How to Create HTTP RFC destination between two ABAP systems

 Details:

Create HTTP RFC destination between two SAP systems

Steps:

1.  Go to the transaction SM59.


2. Click on Create as shown in the screenshot.


3. Provide RFC Destination , Connection Type - H , Target URL & ICM Port.. As a good practice for the HTTP ABAP connection always recommended to create a destination with name convention <SID>CLNT<CLIENT_NO>_HTTP. Also, if you want to access some service give the path of the service in path prefix.


4. Click on Logon Security tab and provide target system Client no., Username and Password and Click on Save to Save the RFC destination.


5. Click on Unicode tab. Now a days all the abap systems are the unicode system. So select the UNICODE radio button and Click on Save.


6.  To test connection goto the shown path to test if the target system is reachable. If the test is successful result will be as shown below.


Note:

- Always make sure to use the SYSTEM type user for the RFC destination.

- Never use DIALOG / COMMUNICATION user type in RFC destination, if the system parameter login/password_expiration_time is set then the user password will expire and RFC will fail.

- In some special case scenario SERVICE type user can be used in RFC destination.

- For trust SSL Handshaking Choose SSL => ACTIVE and Certificate List PSE. Also Upload and save the certificate in the same PSE from STRUST.