Pages

Tuesday, May 28, 2024

Configuration of Cloud Identity Service with Azure AD for SSO


Details:

Configuration of Cloud Identity Service with Azure AD for SSO

Solutions:

 1. Login to the Cloud Identity service tenant, navigate it to Applications & Resources, then Tenant Settings.


2. Navigate it to Single Sign-On and then SAML 2.0 Configuration and then  Click to Download Metadata file to download its metadata for reply party trust.


3. Once metadata is download, login to your Enterprise application on Azure and create the new Application for SAP Cloud Identity and open the application.


4.  After that Click on Setup Single Sign on.


5. Then Click on upload metadata file to upload the downloaded metadata, by uploading all the required information will be filled automatically. Click Save


6. Scroll below and then you can download the Federation XML file from azure application.


7.  Now Navigate to Cloud Identity Service, then choose identity provide in the menu. Click on Create so create a new identity Provider and give its name and save.


8.  Select the created Identity Provider, Then click on trust and then Identity Provider type and select as shown and Save


9. Then Click on SAm2.0 Configuration , Upload the federation XML file and Save.


10. Then Click on Sigle-Sign On enable the shown and save.


SPOOL Overflow

Introduction:

In SAP, spool overflow occurs when the spool request queue exceeds its capacity. TEMSE by default stores 32000 and increased to any number (up to 2 billion). 

The spool system is responsible for managing print requests, including storing and scheduling them for printing. When too many print jobs are queued, and the system cannot process them quickly enough, the spool area becomes full, leading to a spool overflow.

Here are some key points about spool overflow:

1. Spool Requests: These are the print jobs generated by the SAP system, which are stored temporarily before being sent to the printer.

2. Spool Area: This is the storage area where spool requests are held. It has a limited capacity.

3. Overflow Causes: An overflow can occur due to a large number of print requests, slow processing of existing requests, or insufficient spool area size.

4. Impact: When a spool overflow happens, new print requests cannot be stored or processed until space becomes available. This can lead to delays and failed print jobs.

If this happens, you check in SM21 and ST22 transactions, you may encounter some error log or dumps like

  •         SPOOL_INTERNAL_ERROR

Resolution / Troubleshooting:

1. Deleting Old Spool from the system

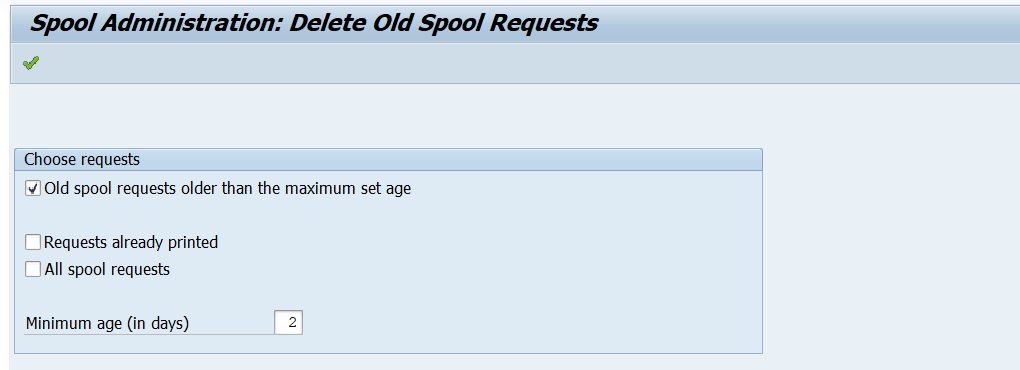
Goto transaction SPAD. From the initial screen, navigate to Administration --> Clean_up Spool. Once you click this, Spool Administration : Delete old spool requests screen will be displayed.
In the screen you will be asked to select/unselect the required:


Select the checkbox according to the requirement and click execute (F8).

2. Scheduling or running the report RSPO0041/RSPO1041

Report RSPO0041/RSPO1041 can be started via Transactions SE38 or SA38. In the spool administration, there is the menu point Delete out-of-date spool requests. Screen is slightly different and does not have as many entry options.

RSPO0041:


RSPO1041:


3. Run TEMSE/Spool Consistency check:

Goto transaction SPAD. From the initial screen, navigate to Administration --> Check Consistency. 


4.  Spool Monitoring from RZ20

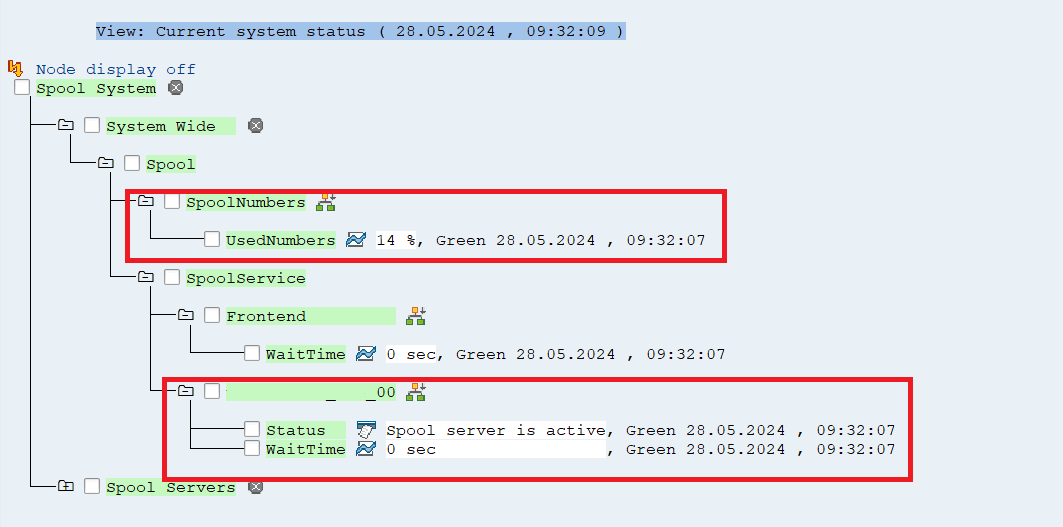
Proactive spool monitoring can be done from RZ20 --> SAP CCMS Monitor Templates --> Spool System


5. Adjust Spool Number range

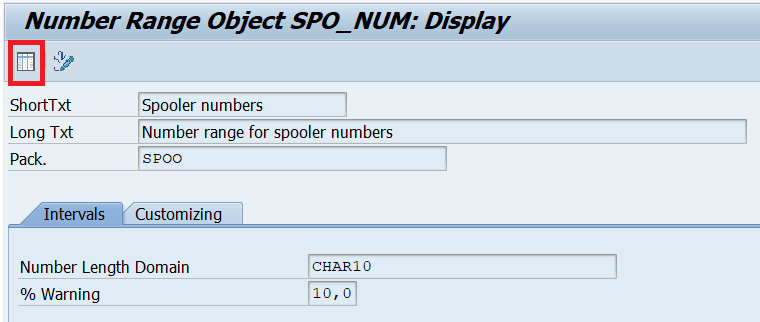
Log on to the system in client 000 and call transaction SNRO --> Object Name (SPO_NUM) and Click Display


To change the interval click on interval editing and then intervals


Adjust the number in To Number column and Save.


Friday, January 5, 2024

User Creation in Netweaver based ABAP system

 Problem:

How to create user in ABAP System


Solution:

1. Run the transaction SU01.


2.  Provide the desired username in text box infront of files username and click on highlighted user button.


3. Now provide the First Name, Last Name and Email address of the user.  On this address screen shown below,  Last name is the Mandatory field to provide.


4. Now you can select the User Type according to the requirement, provide the Intital login password and validity of the user. Specially Valid from.


5. Now on roles tab, you can assign the required roles to the user, by providing the roles in the role field and then click on User Master Record Button.


6. If you want to assign the profile to the user, then Click on Profile tab and assign the authorization profile to the user. Major profile which we assign to user are like SAP_ALL, SAP_NEW etc.


7. Then Click on save button to save the user creation. User has been created and you can now share the inital password to the user.